Wednesday, December 18, 2013

Getting an Antenna Pointing in the Right Direction for an HDHomerun Tuner

Getting your antenna pointed in the right direction for a Silicon Dust HDHomerun tuner isn't too big of a chore if you have an Android phone and a little patience.

I'm assuming you have an HDHomerun tuner plugged into your network.

First, figure out what kind of antenna you need.  AntennaWeb is a great resource for this. Provide your street address and zip code and it'll tell you how far away TV stations are from your house and which direction you need to point your antenna.


I went a little overkill and bough the DB4e antenna from Antenna's Direct.  

Next, figure out how you'll mount your antenna.  For me, I found a broken shower curtain rod that I used for a mounting pole in a scrap piece of lumber.  I then attached the scrap piece to the joists in the attic.  

Using the degree values from AntennaWeb, point your antenna in the right direction.  There's a great free Compass app available in the Android store. Point the top of your phone in a direction and it'll tell you which direction in degrees you are pointing in the bottom left corner.    
.


Use the HDHomeRun Setup application on your computer to scan for channels.  This can be found under the Digital Antenna tab.  After you hit scan, you'll see all the channels your antenna can tune.


To watch a channel, click on one of the hyperlinks.  If the quality is less than desired, adjust the antenna.  If the antenna is far away from your computer (like mine), there's another awesome free Android app that can check signal strength:  HDHomerun Signal Strength.


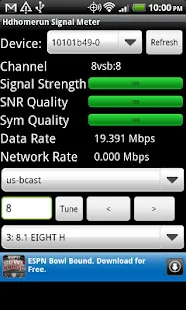
Hopefully, with just a couple of adjustments using the Compass and Signal Strength apps, you'll reach optimal tuning.  This was a big help for me and my antenna mount in the attic.  Here it is after just an hour or so of mounting and adjusting.  


Monday, November 11, 2013

Random Maps of Wake County Demographics

I've been playing around a lot with mapping data recently.  Here are some maps that represent voters in Wake County, North Carolina.  Each map represents a sample of 35000 voters collected from the North Carolina State Board of Elections in October 2013.  Each dot is a single voter and their residential location.


My data was collected from the following sources:

Voter registration information from the NC Board of Elections:  ftp://www.app.sboe.state.nc.us/
Mapping shapefiles from Wake county:  http://www.wakegov.com/gis/services/pages/data.aspx

Geocoding the addresses was done by Texas A&M's Geoservices:  http://geoservices.tamu.edu/

Sunday, November 10, 2013

A Map of Registered Republicans and Democrats in Wake County


Here's my R code.  I utilized the R rgdal package for creating the maps.
This assumes that you've already got your voter data loaded into R.

roads <- readOGR("c:\\data\\poly\\wake_streets\\streets.shp","streets")
roadmap <- spTransform(roads, CRS("+proj=longlat +datum=WGS84"))
county <- readOGR("C:\\data\\poly\\nc_counties\\NC_State_County_Boundary_NAD83HARN.shp",'NC_State_County_Boundary_NAD83HARN')
countymap <- spTransform(county, CRS("+proj=longlat +datum=WGS84"))

plot(roadmap[roadmap$CLASSNAME == 'INT',],col='black',border='black', lwd=.5,axes=F,xlim=c(-79,-78.2),ylim=c(35.5,36.1))
plot(countymap[countymap$County == 'Wake',], add=T)
plot(roadmap[roadmap$CLASSNAME == 'USHWY',],col='black',border='black', lwd=.5, add=T)
points(vtx[vtx$party == 'REP','lng'],vtx[vtx$party == 'REP','lat'],col = rgb(255,0,0,50,maxColorValue=255),cex=.2,pch=20)
points(vtx[vtx$party == 'DEM','lng'],vtx[vtx$party == 'DEM','lat'],col = rgb(0,0,255,50,maxColorValue=255),cex=.2,pch=20)
title("Registered Wake County Republican or Democrats \n (sample of 35,000) - Oct 2013")

My data was collected from the following sources:
Voter registration information from the NC Board of Elections:  ftp://www.app.sboe.state.nc.us/
Mapping shapefiles from Wake county:  http://www.wakegov.com/gis/services/pages/data.aspx

Geocoding the addresses was done by Texas A&M's Geoservices:  http://geoservices.tamu.edu/


Friday, November 1, 2013

Do Running Backs Drafted in Earlier Rounds Perform Better in the NFL?

It appears there is a decent correlation  (0.5, according to my calculations) between an NFL running back's performance and their their draft position.  I'm measuring performance using their career yard total.

This data does NOT include yardage for the 2013 season or players drafted in 2013.


Monday, October 28, 2013

Mapping Shapefiles from the State of North Carolina

I've been looking forever on how to use shapefiles originating from North Carolina for making maps.  Normally, I'll get crazy latitude and longitude coordinates if I plot the shapefiles using the default parameters through R's rgdal package.

Tonight, I stumbled upon this StackOverflow post, which shows that TWO functions are needed in order to fully utilize NC shapefiles: readOGR and spTransform.

I've always just used readOGR, which works fine for shapefile originating from other places, like the US Census bureau.  I've always had problems with files from my state, however, until I came across the aforementioned StackOverflow post.

Here's what I put into R to make a simple map of all roads in Wake County:

roads <- readOGR("c:\\data\\poly\\wake_streets\\streets.shp","streets", p4s = CRS("+proj=lcc +lat_1=34.33333333333334 +lat_2=36.16666666666666 +lat_0=33.75 +lon_0=-79 +x_0=609601.2199999997 +y_0=0 +ellps=GRS80 +towgs84=0,0,0,0,0,0,0 +units=us-ft +no_defs"))
roadmap <- spTransform(roads, CRS("+proj=longlat +datum=WGS84"))
plot(roadmap,axes=T)
title("Roads in Wake County, North Carolina")

This'll produce a map like so:


If you want to try this at home, you can get a bunch of shapefiles from North Carolina's State Board of Elections FTP site that seem to work with this code.

Now that this mystery has finally been uncovered, my mapping options are much improved!

Wednesday, October 2, 2013

Getting Geocodes through R and Google's Web Service

Part of my new job as a Data Integration Analyst is learning how to study and manipulate data.  So far, I've really enjoyed this new challenge and I love having the opportunity to learn something new.  

I learned pretty quickly that R is a pretty popular programming language within the realm of data and analytics.  By itself, R can perform some complex data analysis. However, packages provided by other R enthusiasts can be loaded into the R interface to make it more powerful.  I've spent the last few months getting more familiar with the language and additional packages and learning to appreciate it.  Although I still have a lot to learn, I can already see that R can do a lot of really cool stuff.

One aspect of analytics that I've been particularly fascinated with involves analyzing data through geography.  R has a lot of packages that make this pretty straightforward.  The ones I've seen so far are great, but, in order to map a specific place, you need geocoordinates (latitude and longitude points).  Providing just an address to R and one of these mapping packages won't do.

I really want to map some data regarding voters in my home county, Wake county, North Carolina.  I think I figured out how to do it.

Google provides a free web service that allows you to collect geocoordinates for any address. All you have to do is provide Google with a residential address through a URL.

R has a function that allows you to collect data through the web.  It's as easy as this:

getweb <- url('http://maps.googleapis.com/maps/api/geocode/xml?address=1600+Pennsylvania+Avenue,+20500&sensor=true')
getaddress <- readLines(getweb)
close(getweb)

I've just requested the geocoordinates of the White House, placed the results in another object, then closed the connection with Google.

Google returns the data in an XML string, which is now in my 'getaddress' object.  Google can also return JSON, but R has a package that can interpret XML for you. Once you install the package, you can collect the coordinates from the XML like so:

lng <- xmlValue(getNodeSet(xmlParse(y),'//result//geometry//location//lng')[[1]])
lat <- xmlValue(getNodeSet(xmlParse(y),'//result//geometry//location//lat')[[1]])

You now have coordinates!  Using one of R's available mapping packages, you can plot it like so.  


This simple map was created using one of the easier of R's maps packages to create a map. Here's the process:

map('usa',bg='lightblue',col='tan',fill=T)
points(lng,lat,pch='*',cex=10,col='red')

This is really just a glimpse into the world of mapping through R.  There's a ton of resources out there that allow you to map all sorts of regions, locations, boundaries, and landmarks. 

The possibilities are endless.

NOTE:  Google is very generous to provide geocoordinates for free.  However, they do limit the number of daily queries for each person to 2500.  

Monday, September 23, 2013

Best Football Conference for Getting Drafted

A few weeks ago I was talking to my coworker about how there's a perception that SEC teams dominate college football.  If this were true, I speculated this may be due to better recruiting.  Winning schools typically recruit better.  Recruits want to play for winners. Teams with more exposure and evidence of success are more likely to have their players get drafted into the NFL.

However, is this really the case?  Do players in winning conferences, specifically the big, bad SEC, get drafted higher than players on "weaker" conferences?  Does the best recruiting conference perform the best on the field?

According to scout.com,  the SEC conference is, in fact, typically the best recruiting school.


As you can see from the chart above, the SEC typically gets more top 100 recruits than the other big six conferences (ACC, Big Ten, PAC 12, Big 12 and Big East).  The SEC's only been bested ONCE since 2002.

Does recruiting equate to wins?  They're pretty good each year, but it's not as clear cut as you would think.  However, the SEC is always one of the more highly ranked conferences when the dust settles at the end of the season, according to the Associated Press rankings.


You can see here the SEC teams usually fare better with top 25 votes than schools in other conferences.  However, there have a few years where other conferences have outperformed SEC schools.

Does the SEC pay dividends to the recruits who commit to their schools and help collect top 25 rankings when compared to the other conferences?  NFL teams do draft more SEC players than the other conferences in the majority of years since 2000, but it's certainly not a safe bet.


 This chart show that both the ACC and Big 10 have had more draft picks than the SEC on two occasions since 2000.  In most years, the margins between conference schools is pretty narrow.

So, Recruits fare pretty well on NFL draft day when committing to SEC schools, but it isn't necessarily always THE safest conference to bet on.  The SEC does the best job recruiting, but it doesn't ALWAYS equate to being the dominate conference every year.


Thursday, August 8, 2013

Fixing a Dripping Delta Ball Faucet

Almost immediately after replacing the drain stop in the kids bathtub, the faucet started dripping.  Grrrr.

The tub has one of these types of faucets.  It's called a ball faucet and looks like this:


Instead of continuing to push down as hard as humanly possible on the handle, trying in vain to stop the dripping, I decided it would be a better use of my time to just fix the darn thing.  After a little bit of research, I was ready to tackle this small project.

According to most of the home improvement websites that I visited, dripping faucets are typically caused by worn out washers and other rubber parts.  This seemed to be a pretty universal reason for any type of faucet assembly (judging by my 30 minutes of internet research).

Here's a drawing of a ball faucet layout from Meriam Webster (good idea for them to branch out from being just paper dictionaries! You don't see too many of those anymore.)   The handle's different, but the guts appear to be the same.


With this knowledge and schematic, I took the faucet handle apart and checked out the rubber parts.

From this previous project, I had all the replacement rubber parts.  Since I was taking it apart anyway, I figured that I would just go ahead and replace the rubber pieces.

First, turn the water off to the faucet!  If there's no handle, there's nothing to stop the water from flowing through the faucet assembly.  I had to go under the house and turn off the main water line.

Next, I pried off the "H" and "C" cover with a screwdriver.  This showed a screw, which I removed.  The handle could then be removed.


I then used a wrench to take off the bonnet.

NOTE:  Don't use too much force here.  You don't want to damage the plumbing behind the faucet.  If it's stuck, don't pull with all your might.  Try loosening it up with a hammer.

This exposed the retainer ring, which holds in the first washer and the ball.   Both can then be pulled out by hand.   You can then easily access the washer and replace.   


If you look in the remaining hole, you'll see the valve seats.  I used a pair of needle-nose pliers to get those suckers out, along with their corresponding springs.  I put the new valve seats on the springs and placed on the pliers for reinsertion like so:  

I then stuck both back into the hole.  

After that, everything was put back in its place.  On reassembly, be sure the notch on the packing retainer ring goes into the slot correctly on the wall.  Also, don't put the retainer ring too tightly.  It should be fine with just a hand tightening.  If it's too tight, the valve seats will get worn out faster and the faucet will be difficult to use.

The main water line was then turned back on and the faucet was tested.  

No more leak!

Updated 2/23/2014 with a couple of small notes.


Friday, June 21, 2013

Repairing a Small Retaining Wall

My 35 year old house has reached the age where unexpected things are starting to wear out.  For instance, I had to replace my bathtub drain lever a month or so ago.

One of the many other items starting to show its age is the retaining wall separating my front yard from the road.  It's very small, only about a foot high, but it's starting to become unsightly, particularly the part near my mailbox.  The main reason:  people continue to run into it while backing out of the driveway.

The wall is made out of railroad ties two pieces high. The bottom railroad tie is okay, but the top railroad tie is starting to decompose.  I need to replace it.

I couldn't find much on the internet about this job, but it seemed pretty straightforward. The most challenging part of this was actually finding somebody to sell me a railroad tie.  None of the big box hardware stores (Lowes, Home Depot, Ace, etc) have them in stock.  I finally found somebody in Raleigh/ Cary, Family Home and Garden, that sold them (only $15 each!).  Note:  Railroad ties are pretty heavy.   Although Family Home and Garden will help you get them in your automobile/ trailer, you'll probably want somebody to help you unload them. 

Because people loved driving their cars into the railroad tie near the mailbox, I also wanted to make sure it stayed put when pushed with a lot of force.  I found these three foot solid metal spikes for about $4 each next to the rebar (my initial choice) at Home Depot.


These should be easier to contend with than rebar due to their pointy ends.  I bought four of them.  

In regards to tools, an engineering hammer (2 lbs), wheelbarrow, reciprocating saw (with a decent blade - I used the ones rated for demolition), drill (powerful one with some pretty sizable bits), transfer shovel, trowel, and crowbar were all employed for this task.  YMMV, however, depending on your circumstances.

First up, removing the current, unsightly railroad tie. I live in the woods, so I beat on the old railroad tie for a minute or two to give any current tenants (mice, snakes, etc) an eviction notice.  I next used a crowbar to pry off the old railroad tie.  It was fastened previously with long nails, which I also removed from the top and bottom railroad tie.  

I next prepared the spot for the new railroad tie.  I used a transfer shovel to scrape off all the dirt, rotten wood and other yard gunk.  Using a trowel, I also removed some of the earth being retained behind the wall.  The purpose was so I could set the railroad tie back a couple of extra inches and prevent it from jutting out.  

Then, the new railroad tie tried out its new home.  Make sure you like the way it looks in its spot.  It might not hurt to try flipping it over and comparing other positions.  Mine was a little warped and looked better when rotated.  I also took a little more dirt out  so I could wedge it in better and make it more flush with the retained dirt wall. 

After getting everything situated, it's time to drill.  This took forever since my drill is pretty old and weak. Here's a picture of it.  It was a hand-me-down from my father.


I used a 1" bit and slowly made a hole through the middle of one of the ends of the tie (about a foot from the edge).  Be careful.  My piece was pretty dense and had a few rocks in it.  

I then drove my spike through the drilled hole and the bottom railroad tie with a two pound engineering hammer.

After that, I repeated the drilling and hammering process three more times, once on the other end and twice more closer to the middle.  The new railroad tie is in place!

What about the old rotting one?  I cut it up with a reciprocating saw and hauled it off to the dump.

Overall, this was a pretty easy project.  I probably invested a couple of hours completing it (not counting the time spent hunting down the replacement railroad tie).

Here's the end product.  You can get an idea of the condition of the other railroad ties by comparing the end of the older one next to the new one.  I'll replace the others as time permits.


Wednesday, June 12, 2013

Stuff I Like - Coursera

I recently transferred into a new and exciting data analytics department within my employer.  When they chose me to be part of the team, I was thrilled, but a little anxious.  My background isn't really in analytics.

It was time to roll up the sleeves and get up to speed on this analytics field that I was going to join.  But, where do I start?!?!

Well, I found this great website called Coursera.  Coursera provides a place for universities to have online courses on just about everything.  The schools are pretty prestigious too.  UNC-Chapel Hill, Duke, and a large number of other schools all are represented.

So far, I've taken  (or am currently taking) a class on data analytics, statistics and data science, but there are classes on just about everything.  The professors post online videos, assign homework, and even give you a grade at the end.  They have forums where students can ask teachers (and other students) questions.  So far, it's been the best way I've found to start acclimating myself to this new profession.

And the best part?  It's completely free!  Well, not counting the work you'll have to put in to get the knowledge in your head...

Thursday, May 30, 2013

Resetting your HDHomeRun TV Tuner Automatically

Time Warner Cable is expensive.  Despite that, I still fork over money to them every month.  I try to reduce my costs as much as I can by only subscribing to only their most basic packages, such as the just the basic cable package, which provides only the network channels (ABC, NBC, CBS, FOX, etc) for around $20 a month.

We don't have one of their cable boxes, which can allow you to record channels and watch them later.  A wonderful service, but I'm way too cheap for that.  Instead, I use a computer to record the channels through the wonderful  SageTV software.  Unfortunately, the SageTV company was bought out by Google and the software can no longer be purchased.

To tune in the channels with the computer, the SageTV software interacts with a nifty device from Silicon Dust called the HDHomerun.  It's a TV tuner that hooks up to your network.  I've been using one of these for years with little complaint.  

Note, though, that I said "little." I had an older model that kept misbehaving.  It took me a couple of months of troubleshooting before giving up and just replacing the device.  Before I got there, I tried a couple of other approaches.  I thought my computer might be the culprit, so I rebuilt it and set it up to reboot every night (as I discussed here a couple of weeks ago).   I also set up the HDHomerun TV tuner to reboot nightly through a quick and dirty program and a scheduled task.

Creating the means to reset the HDHomerun was actually a lot easier than I thought.  I first found this document from Silicon Dust explaining how you can interact with a Silicon Dust program installed on my computer that interacts with the tune (hdhomerun_config.exe).  I then found the following function in the application available through their help file.

set /sys/restart self

This is the command I need to restart the HDHomerun tuner.

I created a bat file with the following line through Notepad.

"c:\Program Files\Silicondust\HDHomeRun\hdhomerun_config.exe"  10324a85 set /sys/restart self

The 10324a85  is the unique number given to my tuner so the hdhomerun_config program knows which tuner to reset.  You can get this number through the HDHomerun Setup program which is accessible through the Start menu. The unique number is listed right here:


I then set up a scheduled task to run this program regularly to reset my tuner.  

For instructions on creating the bat file and setting up the scheduled tasks, I discussed both in a post I did a couple of weeks ago on how to set up your PC to reboot regularly.  The process should be pretty similar.

Even though I've replaced the tuner I was originally using when I set this up, I still reset the new tuner every night.  I figure it doesn't hurt anything.

I'm happy with my setup, but wish I could continue to reduce my cable bill.  In a month or so, I'm going to start experimenting with antennas to see if I can get TV reception over the air.  I'm a bit skeptical, though.  My house is in a pretty wooded area and I'm not too fond of mounting an antenna on my roof.  

Will my frugality and curiosity win out over my fear of heights?  Stay tuned!

Wednesday, May 22, 2013

Replacing a Bathtub Drain Lever and Lever Cover

Since I moved into my current house, I thought the drain in the kids tub drained like we had filled it with molasses.  Sometimes it would take up to an hour for all the water to finally get out of the tub.

For the longest time, I ignored the problem or just put it in the back of my mind.  I mean, there's always going to be a bigger fish to fry somewhere, right?  Well, since the kid's tub is something we use on a daily basis (more or less :) ), I started Googling a little more each day until it was on the forefront of my mind.

The first thing I noticed was that the lever you pull up that stops the water didn't go up all the way.  Also, the cover that houses the lever was a little dented.  It's old and, I assume, the original in our 35 year old house.  So, after scouring the internet to see if this was something to be meddled with, I decided to attempt to dig into the tub drain.

This "This Old House" Q&A post provided a very handy diagram on how the lever worked with the bathtub, although the question submitter was having a different issue.  It seemed pretty straightforward.

I took the lever off of the bathtub, which was held on by two front facing screws.  I pulled out the linkage and stopper that were attached to the lever.  Here's what it looked like. Note the beautiful puke green tile in our bathroom. :)


Looking at the lever, there was a bunch of really gross calcified gunk that was preventing the lever from going up all the way.  I couldn't get it all off.  Since the gunk was stubbornly stuck on the lever and there was a noticeable dent in the lever cover, I decided that replacing the lever and lever cover would be best.

Off to Home Depot I went to find a new lever and lever cover.  Unfortunately, Home Depot didn't sell the individual components, only a whole draining assembly.  Wanting to get this project over, I went ahead and bought it for around $25.  Here's what it looks like.


I got home and pulled out the the parts I needed from the package.  I then attached the old stopper and linkage to the new lever using a pin that came in the package.  Since the old linkage and stopper are not broken and the stopper and linkage I bought were made out of plastic, I decided to reuse the old parts.  Here's what it looked like after the assembly.


I then screwed the new assembly into the tub and tried out the lever.  It was MUCH smoother and went all the way up and down, just like I wanted.


I then tested it out by filling up the tub a few inches, leaving the water for a few minutes to make sure the stopper is still doing it's job, and then pulling the lever.  The water exited the tub MUCH faster.  

That was pretty much it.  Not counting the drive to Home Depot, the whole replacement process was probably about 15 minutes.


Friday, May 17, 2013

Setting up your Computer to reboot nightly

For whatever reason, my computer's performance began to suffer if left running for too long.  It can be frustrating when you're waiting what feels like an eternity to just open Chrome and do a Google search on my Windows computer!

To address this, I attacked it from a couple of fronts.  First, I uninstalled a bunch of programs that I wasn't using.  Second, I set my computer up to automatically reboot every night, which was a pretty straightforward process.  In essence, I created a program that reboots your computer then set that program to initialize every morning.


First, thanks to Computerhope.com, I figured out how to properly restart my computer through Microsoft's Command Prompt (which I haven't used in ages).  You simply type in "shutdown -r" within Command Prompt and the computer starts the rebooting process.


You can actually bottle this up and turn it into an application. As an application, you can reboot simply by double clicking on it.  Just open Notepad and type the same thing you entered into Command Prompt.

Save the file with the name "Reboot.bat," but not as a txt file. Change the "Save as Type" to "All Files."  Remember where you're saving the file.  You'll need to reference this later.  

Next, create a scheduled task.  A scheduled task can be set up to tell your computer to run a specific program at a specific time.  When you set up the schedule, you can also establish recurrence.  To access the Scheduled Task interface, click the Start button --> All Programs --> Accessories --> System Tools --> Task Scheduler.  

On the corresponding window, click "Create Basic Task."


Another window will appear.  Give your task a name and description.  Press NEXT.


Select how often you'd like your computer reset. Press NEXT.


Select the time you'd like for the reboot to occur.  You can also tweak the frequency if you want the computer to reset every other day or more by changing the Recur value.  When you're done, hit NEXT.


Select "Start a Program" and select the NEXT button.


Select the script we created earlier by pressing the "Browse" button and digging through your folders. Once you select the file, you can press NEXT again.


You'll see this screen.  Hit FINISH.


That's all there is to it!  You can check and make sure you're computer is rebooting by going back into Task Scheduler where your task will be listed along with the last time it successfully run.  We can talk about that in another post.  


Saturday, April 27, 2013

Doug's Adventures Redux!

I'm surprised Google didn't scrub my account out of the system...

I hope to be back with some content in the next week or so.

-Doug